Elasticsearch
Quick Summary
DeepEval allows you to evaluate your Elasticsearch retriever and optimize retrieval hyperparameters like top-K, embedding model, and similarity function.
To get started, install Elasticsearch through the CLI using the following command:
pip install elasticsearch
Elasticsearch is a fast and scalable search engine that works as a high-performance vector database for RAG applications. It handles large-scale retrieval workloads efficiently, making it ideal for production use. Learn more about Elasticsearch here.
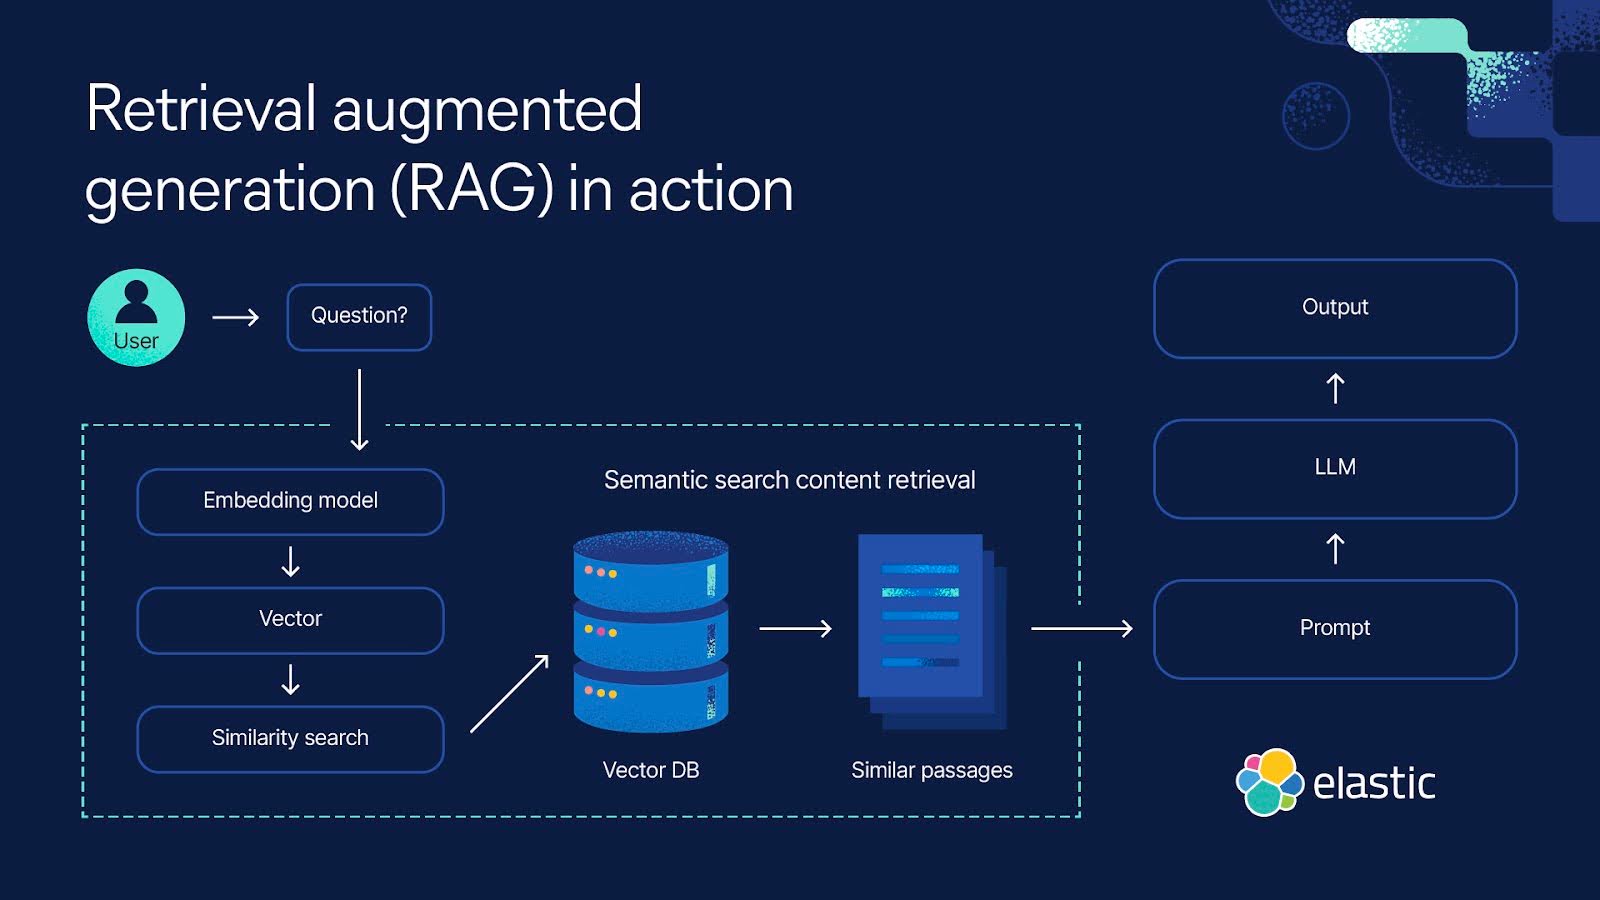
This diagram illustrates how the Elasticsearch retriever fits into your RAG pipeline.
Setup Elasticsearch
To get started, connect to your local Elastic cluster using the "elastic" username and the ELASTIC_PASSWORD environment variable.
import os
from elasticsearch import Elasticsearch

username = 'elastic'
password = os.getenv('ELASTIC_PASSWORD') # Value you set in the environment variable

client = Elasticsearch(
    "http://localhost:9200",
    basic_auth=(username, password)
)
Next, create an Elasticsearch index with the appropriate type mappings to store text and embedding as a dense_vector.
# Create index if it doesn't exist
if not es.indices.exists(index=index_name):
    es.indices.create(index=index_name, body={
        "mappings": {
            "properties": {
                "text": {"type": "text"},  # Stores chunk text
                "embedding": {"type": "dense_vector", "dims": 384}  # Stores embeddings
            }
        }
    })
Finally, define an embedding model to convert your document chunks into vectors before indexing them in Elasticsearch for retrieval.
# Load an embedding model
from sentence_transformers import SentenceTransformer
model = SentenceTransformer("all-MiniLM-L6-v2")

# Example document chunks
document_chunks = [
    "Elasticsearch is a distributed search engine.",
    "RAG improves AI-generated responses with retrieved context.",
    "Vector search enables high-precision semantic retrieval.",
    ...
]

# Store chunks with embeddings
for i, chunk in enumerate(document_chunks):
    embedding = model.encode(chunk).tolist()  # Convert text to vector
    es.index(index=index_name, id=i, body={"text": chunk, "embedding": embedding})
To use Elasticsearch as part of your RAG pipeline, simply use it to retrieve relevant contexts and insert them into your prompt template for generation. This ensures your model has the necessary context to generate accurate and informed responses.
Evaluating Elasticsearch Retrieval
Evaluating your Elasticsearch retriever consists of 2 steps:
- Preparing an
inputquery along with the expected LLM response, and using theinputto generate a response from your RAG pipeline to create anLLMTestCasecontaining the input, actual output, expected output, and retrieval context. - Evaluating the test case using a selection of retrieval metrics.
An LLMTestCase allows you to create unit tests for your LLM applications, helping you identify specific weaknesses in your RAG application.
Preparing your Test Case
Since the first step in generating a response from your RAG pipeline is retrieving the relevant retrieval_context from your Elasticsearch index, first perform this retrieval for your input query.
def search(query):
    query_embedding = model.encode(query).tolist()

    res = es.search(index=index_name, body={
        "knn": {
            "field": "embedding",
            "query_vector": query_embedding,
            "k": 3  # Retrieve the top match
            "num_candidates": 10  # Controls search speed vs accuracy
        }
    })

    return res["hits"]["hits"][0]["_source"]["text"] if res["hits"]["hits"] else None

query = "How does Elasticsearch work?"
retrieval_context = search(query)
Next, pass the retrieved context into your LLM's prompt template to generate a response.
prompt = """
Answer the user question based on the supporting context

User Question:
{input}

Supporting Context:
{retrieval_context}
"""

actual_output = generate(prompt) # hypothetical function, replace with your own LLM
print(actual_output)
Let's examine the actual_output generated by our RAG pipeline:
Elasticsearch indexes document chunks using an inverted index for fast full-text search and retrieval.
Finally, create an LLMTestCase using the input and expected output you prepared, along with the actual output and retrieval context you generated.
from deepeval.test_case import LLMTestCase

test_case = LLMTestCase(
    input=input,
    actual_output=actual_output,
    retrieval_context=retrieval_context,
    expected_output="Elasticsearch uses inverted indexes for keyword searches and dense vector similarity for semantic search.",
)
Running Evaluations
To run evaluations on the LLMTestCase, we first need to define relevant deepeval metrics to evaluate the Elastisearch retriever: contextual recall, contextual precision, and contextual relevancy.
These contextual metrics help assess your retriever. For more retriever evaluation details, check out this guide.
from deepeval.metrics import (
    ContextualRecallMetric,
    ContextualPrecisionMetric,
    ContextualRelevancyMetric,
)

contextual_recall = ContextualRecallMetric(),
contextual_precision = ContextualPrecisionMetric()
contextual_relevancy = ontextualRelevancyMetric()
Finally, pass the test case and metrics into the evaluate function to begin the evaluation.
from deepeval import evaluate

evaluate(
    [test_case],
    metrics=[contextual_recall, contextual_precision, contextual_relevancy]
)
Improving Elasticsearch Retrieval
Below is a table outlining the hypothetical metric scores for your evaluation run.
Metric | Score |
|---|---|
| Contextual Precision | 0.85 |
| Contextual Recall | 0.92 |
| Contextual Relevancy | 0.44 |
Each contextual metric evaluates a specific hyperparameter. To learn more about this, read this guide on RAG evaluation.
To improve your Elasticsearch retriever, you'll need to experiment with various hyperparameters and prepare LLMTestCases using generations from different retriever versions.
Ultimately, analyzing improvements and regressions in contextual metric scores (the three metrics defined above) will help you determine the optimal hyperparameter combination for your Elasticsearch retriever.
For a more detailed guide on tuning your retriever’s hyperparameters, check out this guide.